After loading the database, the tables will be shown in the database pane on the left pane. To access ALL setting for a table (including Multi-page, Table-specific Options and Master/Detail), click the table node of any table in the database pane and then click the Table tab to go to the Table Setup page. This is the setup page for a single table.
To search for a table, use the searchbox in the Database pane.
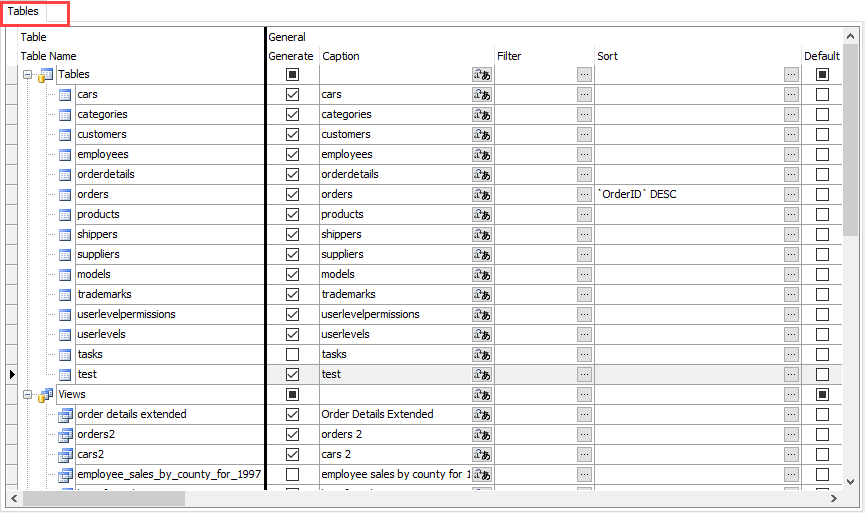
You can also click on the Tables or Views or Custom Views or Reports or Linked Tables node in the database pane to go to the Tables Setup page which is a grid showing the most frequently used settings for all tables. If you need to set these settings for multiple tables, this page allow you to view and set them quickly. Note that this page does not include Multi-page, Table-specific Options and Master/Detail.
If you prefer to view the tables in alphabetical order, click Tools->Sort Tables Alphabetically.
You can still change the display order of the menu item by drag-and-drop. Select a table by clicking the first column - Table/View Name column, then drag and drop to where you want. Note that a table cannot be moved out of its parent node.
Note that changing the display order of table in this Table Setup page does not change the display order of the tables in the menu. To change the display order of the menu item, click Tools->Menu Editor.
The available table level settings are as follows:
General
| Generate | Select/unselect a particular table for generation |
| Caption | To change the caption of a table, click on Caption box to make the necessary change. |
| Filter | Specify a filter (WHERE clause) for the table. Click the [...] button in Filter column, the Filter Editor will popup. Enter your filter, you can drag the field names from the left pane to the editor, the SQL identifier quote characters will also be added for you automatically.
Note The filter must be a valid PHP expression and it will be concatenated to the SQL. If it is a string, it should be single or double quoted. For example, "State = 'CA'".
|
| Sort | Specify the sort fields (ORDER BY clause) for the table. Click the [...] button in Sort column, the following dialog box will popup. You can choose up to 6 fields, in either ascending or descending order.
|
| Include common files | For use with Custom File and for PHP file only. Include common files such as header and footer so the custom file will have the same layout . |
| Default | Set a Table as the Default Table. The Default table is the first table the user see when visiting your site. Select the table you want in the Default column. |
| Update table | For tables and views only. Set the table to be updated. If unspecified, the Update Table is the table itself. For Update Table to work properly, the following conditions must be met.
**Conditions**
1. The Update Table must be from the same database as the current table or view (i.e. not a linked table from another database).
1. The field names in the Update Table must be the same.
|
List
| Inline-Add | Enable Inline-Add function for the table. Inline-Add allows users to add a record in the List page. Default is disabled. |
| Inline-Copy | Enable Inline-Copy function for the table. Inline-Copy allows users to copy a record in the List page. Default is disabled. |
| Inline-Edit | Enable Inline-Edit function for the table. Inline-Edit allows users to edit a record in the List page. Default is disabled. |
| Grid-Add | Enable Grid-Add function for table. Allows users to add multiple records to the table. Default is disabled.
If the table is a detail table (in master/detail relationship), enabling this option also enables Master/Detail-Add. |
| Grid-Edit | Enable Grid-Edit function for table. Grid-Edit allows users to edit multiple records in the List page. Default is disabled.
If the table is a detail table (in master/detail relationship), enabling this option also enables Master/Detail-Edit. |
| Multi-Edit | Enable Multi-Edit function for table. Multi-Edit allows users to edit multiple selected records in the List page. Default is disabled.
Note Unlike Grid-Edit, the Multi-Edit function does not support adding/deleting records.
|
| Modal dialog (Grid-Add) | Enable modal dialog for Grid-Add function. Default is disabled. If disabled, the function works by re-loading the List page in Grid-Add mode.
Note Custom Template is not supported. |
| Modal dialog (Grid-Edit) | Enable modal dialog for Grid-Edit function. Default is disabled. If disabled, the function works by re-loading the List page in Grid-Edit mode.
Note Custom Template is not supported. |
| Modal dialog (Multi-Edit) | Enable modal dialog for Multi-Edit function. Default is disabled. If disabled, the function works by re-loading the List page in Multi-Edit mode.
Note Custom Template is not supported. |
| Import | Enable Import function for table. The Import feature enables you to import records from an external Excel/CSV file to database table. Default is disabled. Read Import Data for more information. |
| Requires Search | Specifies if the List page requires search criteria. Default is disabled.
Notes
|
| Sequence number | Add a column to show the sequence number (record index) of the record in the page. |
| Master/Detail Add (as Detail) | Enable Master/Detail-Add function for table (as detail table). Allows users to add multiple records to the detail table in the Add page of the master table. Default is disabled. |
| Master/Detail Edit (as Detail) | Enable Master/Detail-Edit function for table (as detail table). Allows users to edit multiple records of the detail table in the Edit page of the master table. Default is disabled. |
| Master/Detail View (as Detail) | Enable Master/Detail-View function for table (as detail table). Allows users to view multiple detail records in the View page of the master table. Default is disabled. |
| Multiple detail tables | Enable multiple Detail Add/Edit/View.
By default each pair of Master/Detail tables are handled separately, meaning that in a page, there are one master table (the current table) and one of its detail tables only. If this option is enabled, all detail tables will be displayed together in the same page. Enabling this option will hide separate Master/Detail table pairs. |
| Detail record count | Specifies if the number of detail records for the master record should be displayed. Default is disabled.
Note
|
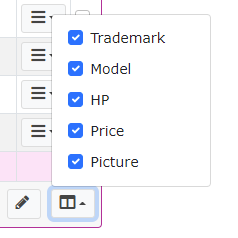
| Column Visibility | Specifies if the table columns in the List page can be shown/hidden by users. For table view only, Multi-Column List page (cards view) is not supported. Default is disabled. If enabled, a dropdown button will be enabled in the table's top/botton panel for user to select columns, e.g.
|
| Preview Field | Specifies if a field value should be shown in an expanded table row when a data row is clicked. For table view only, Multi-Column List page (cards view) is not supported. Default is disabled. If enabled, a table row will be shown/hidden on click, e.g.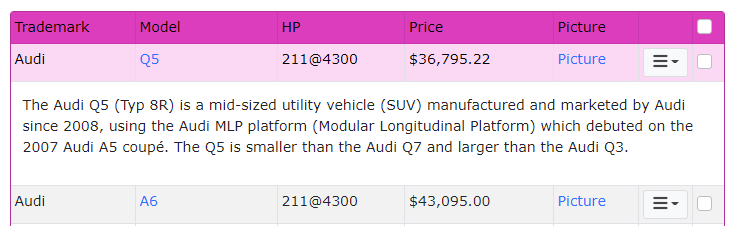 |
Search
| Quick | If enabled, Quick Search panel (including Extended Quick Search) will be generated with the List page. Default is enabled.
Quick Search searches text fields and optionally numeric fields only. These fields are selectable in Field Setup page. You may want to hide the Quick Search form for tables that do not have searchable fields. |
| Default value (Quick) | Default value for Quick Search.
If no user input for Quick Search, this default value will be used. After users entering their search criteria, the default value will not be used. |
| Default search type (Quick) | Default search type for Quick Search. Possible values are:
|
| Extended | If enabled, Extended Quick Search inputs will be generated in the List page. Default is enabled. Also used by reports. |
| Fields per row (Extended) | For use with Extended Quick Search. Specifies the number of fields per row in the Quick Search panel. Default is 0 (unspecifed), which means one field per row. Also used by reports. |
| Advanced | If enabled, an Advanced Search Page will be generated and linked to the List page. Default is disabled. |
| Query Builder | If enabled, the Query Builder Page will be generated and linked to the List page (or Dashboard report). Default is disabled. |
| Modal dialog (Advanced / Query Builder) | For use with Advanced Search (or Query Builder for the Dashboard report). Use modal dialog to show the Advanced Search page (or Query Builder for the Dashboard report). |
| Highlight | If this setting is checked, the search criteria in the search result (List page) will be highlighted. Default is disabled. |
View
| View | If enabled, a View page for the table will be generated (for displaying a record). Default is enabled.
Note The table must have primary key or this setting will be unchecked during generation. |
| Modal dialog | Use modal dialog to show the View page. |
Add
| Add | If enabled, an Add page for the table will be generated (for adding a record). Default is enabled. |
| Copy | If enabled, Add page will be generated and "Copy" links will be generated for record(s) in List/View page (for copying). Default is enabled. (If this setting is enabled, the "Add" setting is also enabled by default as copying requires the Add page.)
Note The table must have primary key or this setting will be unchecked during generation. |
| CAPTCHA | Enable CAPTCHA function for the Add page. Default is disabled. (CAPTCHA requires that the user type the letters or digits of a distorted image before submitting a form to prevent automated software from posting spam to your web application.)
Notes
|
| Confirm | Enable confirmation function for the Add page. Default is disabled. If enabled, there will be a confirmation step in the Add page, users will be able to check their input before actually inserting the record.
Note Not applicable to Inline/Grid-Add/Copy. |
| Modal dialog | Use modal dialog to show the Add page. |
Delete
| Delete | If enabled, a Delete page for the table will be generated (for deleting record or multiple records). Default is enabled.
Note The table must have primary key or this setting will be unchecked during generation. |
| Inline-Delete (Modal dialog) | Use modal dialog to show the deletion confirmation message. |
| Soft delete field |
For use with **SoftDeleteable** behavior. This is the field that will be used to determine if the record is "removed" or not. The field MUST be of **nullable** DATE or DATETIME type, ``NULL`` means the record is not removed, a date value means it has been removed (not actually deleted from the table).
**SoftDeleteable** behavior allows users to "soft delete" records, filtering them at SELECT time by marking them deleted as with a timestamp, but not explicitly removing them from the database. If **Hard-Delete** (see below) is enabled, the record will be actually removed when the record is deleted again.
**Note** SoftDeleteable behavior is supported by [entities](orm.html?id=entities-and-the-identity-map), see [SoftDeleteable](orm.html?id=softdeleteable) for details.
|
| Hard-Delete (for soft delete) | Whether to enable hard delete after soft delete has already been done. | Time-aware (for soft delete) | If enabled, you can set an expiration datetime to the **Soft delete field**. The records will continue to appear before expiration. The expired records will not be actually deleted unless you enable **Hard-Delete** and you explicitly delete them. |
Edit
| Edit | If enabled, an Edit page for the table will be generated (for updating a record). Default is enabled.
Note The table must have primary key or this setting will be unchecked during generation. |
| CAPTCHA | Enable CAPTCHA function for the Edit page. Default is disabled. (CAPTCHA requires that the user type the letters or digits of a distorted image before submitting a form to prevent automated software from posting spam to your web application.)
Notes
|
| Confirm | Enable confirmation function for the Edit page. Default is disabled. If enabled, there will be a confirmation step in the Edit page, users will be able to check their input before actually updating the record.
Note Not applicable to Inline/Grid-Edit. |
| Check Conflicts | Check if the record is changed by other user before updating the record.
Notes
|
| Modal dialog | Use modal dialog to show the Edit page. |
Multi-Update
| Multi-Update | If enabled, a Multi-Update page for the table will be generated (for updating multiple records). Default is disabled. With this feature you can select multiple records in the List page and update all records at the same time. You can select fields (see Field Setup page) to be included in the Multi-Update page.
Note The table must have primary key or this setting will be unchecked during generation. |
| Confirm | Enable confirmation function for the Multi-Update page. Default is disabled. If enabled, there will be a confirmation step in the Multi-Update page, users will be able to check their input before actually updating the selected records. |
| Modal dialog | Use modal dialog to show the Multi-Update page. |
Audit Trail
To use this feature, you must also specify the Audit Trail folder or database table and field under PHP->General Options tab. See PHP Settings for details.
| Audit Trail | If audit trail for a table is enabled, when an user add/copy/edit/delete a record or login/logout, the related information will be logged in a log file or into the specified database table.
Note By default all add/copy/edit/delete info will be logged, if you want to select what to log, or want to log search/view activities also, use the Audit Trail Extension, also see Extensions. |
Email Notification
To use this feature, you must also specify the Email Settings under PHP->Email Settings tab. See PHP Setup for details.
| On Add | If enabled, when an user add a record, an email will be send to pre-set recipient email address(es). Default is disabled. |
| On Edit | If enabled, when an user edit a record, an email will be send to pre-set recipient email address(es). Default is disabled. |
| On Delete | If enabled, when an user delete a record, an email will be send to pre-set recipient email address(es). Default is disabled. |
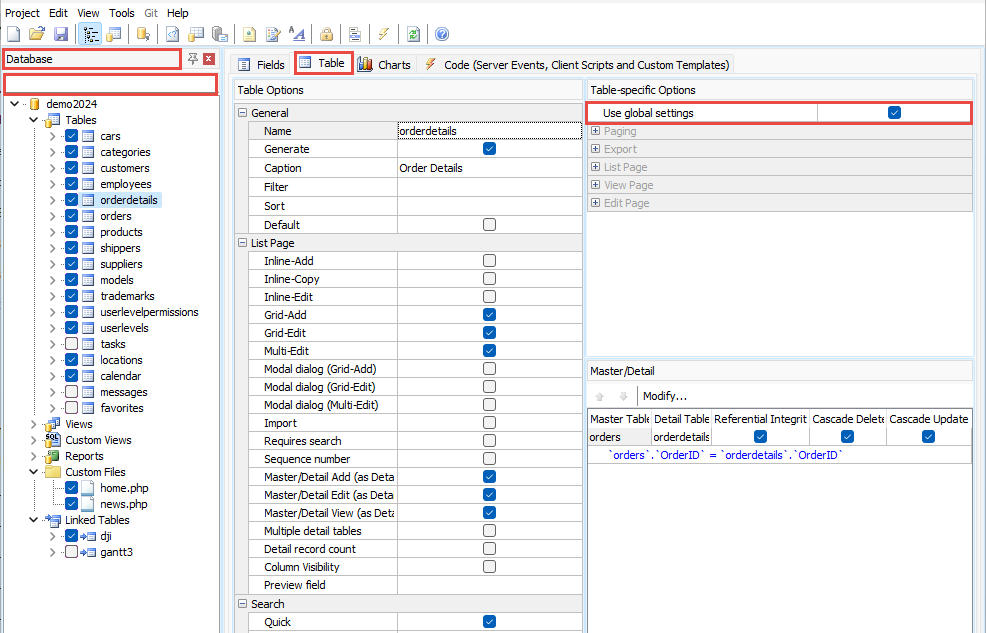
Other than above Tables Setup page, you can also click on a particular table node (under Tables or Views or Custom Views or Reports or Linked Tables node) in the database pane to go to the Table Setup page for that table. The Table Setup page includes the following tabs: Table, Fields, and Server Events/Client Scripts. Click on the Table tab you'll see settings for the selected table only. The right side includes two panel - the Table-specific Options panel and the Master/Detail panel (see below), the left side contains settings same as above (but for the selected table only) and other settings:
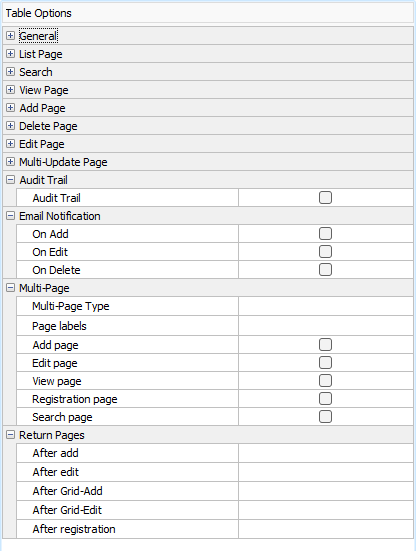
Multi-Page
Normally each field is displayed as a table row in the View/Add/Edit page, the Multi-Page feature allow you to divide the fields into pages and display only one page at a time. To enable, at least one field with page number larger than 1 must be set up in Field Setup page.
| Multi-Page type | Specifies how to display the pages. Possible values are:
|
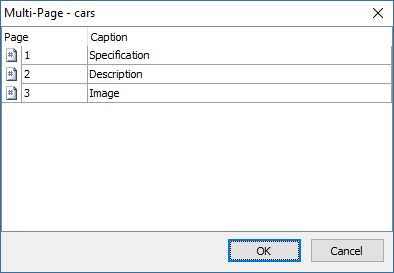
| Page Labels | Specifies the page captions of each page in the Multi-Page. Click the [...]button and enter the page captions and click OK to save.
If page captions are not specified, "Page n" will be used by default. To add a page, go to Field Setup page, specify the page number for the fields in the page first. Note If you use Multi-Language (see PHP Settings), use Multi-Language Property Editor, see Tools for details. |
| Add page | Specifies if Multi-Page is enabled for Add page. |
| Edit page | Specifies if Multi-Page is enabled for Edit page. |
| View page | Specifies if Multi-Page is enabled for View page. |
| Registration page | Specifies if Multi-Page is enabled for registration page. This setting is only available for the user table specified in Security Settings. |
| Search page | Specifies if Multi-Page is enabled for Advanced Search page. |
Return Pages
| After Add | Specifies the return URL after a new record is added. Predefined settings are:
Add Page - returns to the Add page of the current table You can also enter your own URL.
Notes
Example 1 "MyPage" Example 2 "MyPage?xxx=" . urlencode($this-><Field>->CurrentValue) e.g. "MyPage?ID=" . urlencode($this->ID->CurrentValue) Example 3 "<DetailTable>list?action=gridadd&showmaster=<Table>&fk_<KeyField>=" . urlencode($this-><Field>->CurrentValue) e.g. "orderdetailslist?action=gridadd&showmaster=orders&fk_OrderID=" . urlencode($this->OrderID->CurrentValue) Example 4 "<DetailTable>add?showmaster=<Table>&fk_<KeyField>=" . urlencode($this-><Field>->CurrentValue) e.g. "orderdetailsadd?showmaster=orders&fk_OrderID=" . urlencode($this->OrderID->CurrentValue) |
| After Edit | Specifies the return URL after a record is edited.
Notes
|
| After Grid-Add | Specifies the return URL after Grid-Add is done. Predefined settings are:
List Page - returns to the List page of the current table (default) You can also enter your own URL. The URL must be a valid PHP expression. If it is a string, it should be double quoted. |
| After Grid-Edit | Specifies the return URL after Grid-Edit is done. Predefined settings are:
List Page - returns to the List page of the current table (default) You can also enter your own URL. The URL must be a valid PHP expression. If it is a string, it should be double quoted. |
| After registration | Specifies the return URL after an user is registered. This setting is only available for the user table specified in Security Settings.
Notes
|
Report Settings
| Export page size | Specifies the number of groups (or records if no grouping field) in each page of the exported document (page breaks will be inserted between pages). Default is 0, i.e. disabled, no page breaks. If you enter n (where n > 0), there will a page break inserted every n groups/records.
Notes
|
| Show report | Show both report data (in HTML table) and charts (if any). If you want the report to show charts only, uncheck this setting. |
| Include details | If checked, records belonged to each grouping level will be displayed under the grouping level title, then followed by the summary. If unchecked, the details records are skipped, only the summary will be displayed.
Note NOT applicable to Crosstab reports. |
| Include row sums | Includes row sums for the crosstab report
Note For use with Crosstab reports only |
| Show page summary | If checked, the summary for the records in the current page will be displayed at the end of the page. |
| Show grand summary | If checked, the summary for all the records in the report will be displayed at the end of the page. |
| Show compact summary view | If checked, the summary will be displayed as columns for each group. The details records are not displayed. If unchecked, the summary are displayed at the bottom of each group.
Note NOT applicable to Crosstab reports. |
| Show compact summary footer | If checked, the summary footer for each grouping levels will be displayed in a single row instead of multiple rows.
Note NOT applicable to Crosstab reports. |
| Show grouping levels as rows | If checked, the grouping levels will be displayed as rows instead of columns.
Note
|
| Requires Search | Specifies if the report requires search criteria. Default is disabled.
Note If enabled, the report always requires search criteria. When the page is initially loaded, no records will be displayed until searching is done. (Remember to enable Extended Search, see above.) |
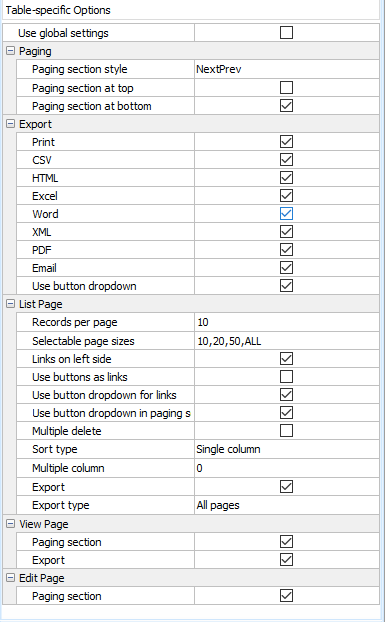
Table-specific Options
These options are same as the List page options as described in PHP Settings except that the options are table-specific, meaning that you can have different List page options for different tables. To use table-specific options, select a table in the grid, uncheck Use global settings in the Table-specific Options panel, the panel will be enabled for you to setup.
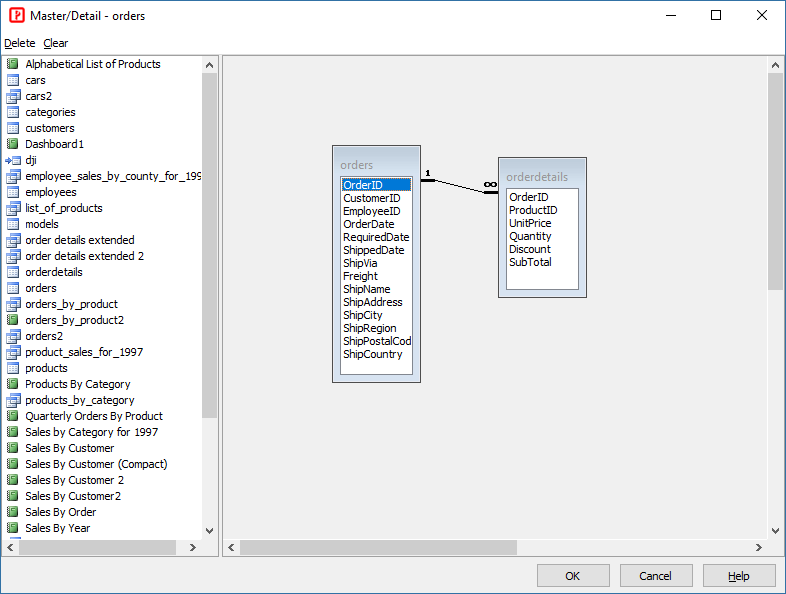
Master/Detail
When you set up a master/detail (one-to-many) relationship, you link two tables so that all the records of one table (the detail table) are linked to a single record in the other table (the master table). Each table can have multiple master tables and details tables.
You can establish master/detail relationship between two tables as follows
If you want to remove a relationship, select the link in the diagram and click Delete. After setup, click OK to confirm.
In most cases, master and detail tables are joined by one field, you have one link between the master/detail table and you have one row in the Master/Detail panel only.
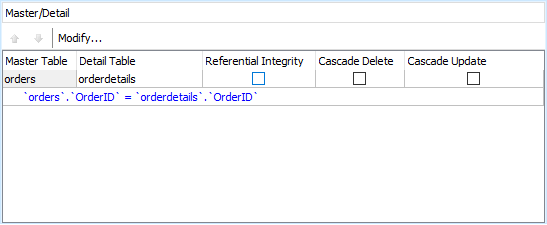
| Referential Integrity | Specifies that user may not add/update a record in the detail table unless the foreign key points to a valid record in the master table. |
| Cascade Delete | Specifies that if a record in the master table is deleted, all corresponding records in the detail table will be deleted.
Note If you have used ON DELETE CASCADE for the table in the database, no need to enable this setting. |
| Cascade Update | Specifies that if the primary key for a record in the master table changes, all corresponding records in the detail table will be updated.
Note If you have used ON UPDATE CASCADE for the table in the database, no need to enable this setting. |
Also See