Extensions
An extension allows you to "extend" the template to support additional features such as implementing third party tools.
Notes
- An extension is NOT a project template, do not try to select an extension as a template for generation.
- Custom View Tags and Custom Edit Tags are also extensions, but used specifically for displaying and editing fields. They are not set up in Tools->Extensions, but in View Tag panel and Edit Tag panel, see Field Setup.
- All extensions are only provided as examples on how to extend the template with your own code, all third party tools used in extensions and all extensions are not part of PHPMaker, NO TECHNICAL SUPPORT WILL BE PROVIDED. Also see Third-party Tools for more information on the third-party tools.
Using Extensions
Click Tools->Extensions to enable or disable these extensions. Before enabling the extension, make sure you read the notes about the extension first. If the extension has advanced settings (NOT every extension has), you'll see the Advanced tab after selecting the extension. Click the Advanced tab to configure settings for the extension.
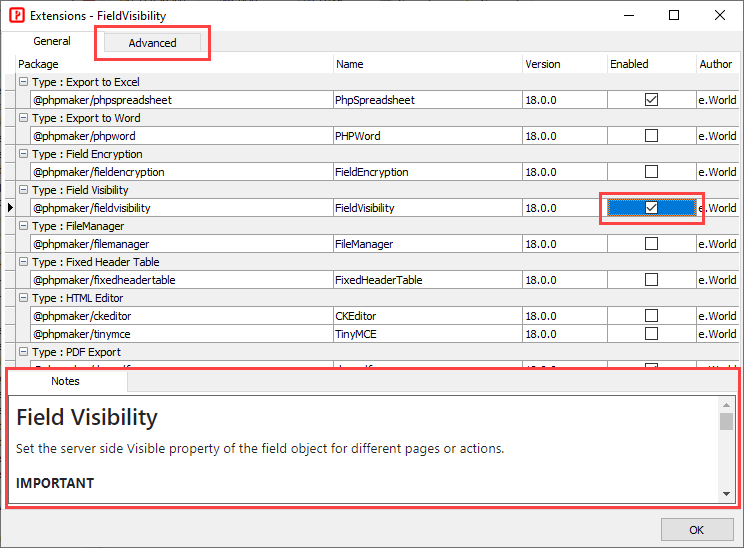
In the Advanced tab, you may see Project, Tables, and Fields tabs, depending on extensions. Note that NOT every extension has all 3 tabs, some extensions may have project level settings only, some extensions may have table or field level settings also, e.g.
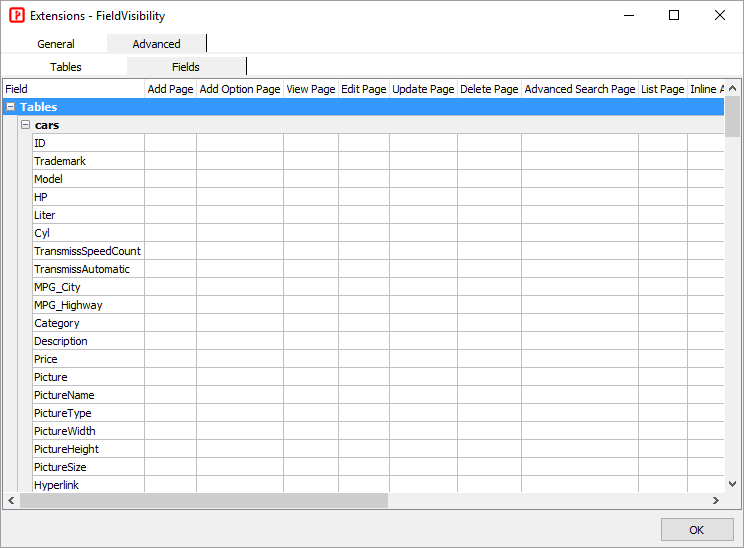
Note The table or field names in the Tables or Fields tabs are searchable, to find a table or field, just focus the Table or Field column by clicking the column first and then type the table or field name.
Making Extensions
It is simple to make your own extensions. Each extension is a npm package. Each package MUST have the following files in the root-level directory of the package:
1. package.json
A package is a directory that is described by a package.json file. For more information on creating a package.json file, see Creating a package.json file.
The package.json of an extension MUST contain (but not limited to) the following fields:
- name - Package name, and must be lowercase and one word, and may contain hyphens and underscores. The name can be scoped or unscoped, see Package name guidelines.
- version - Version number in the form x.x.x and follow the semantic versioning guidelines.
- phpmaker - Type of the package. Possible values are: "extension",
"custom view tag" or "custom edit tag". Note This is a custom field required by PHPMaker, if not found, the package will be ignored.
e.g. package.json
Note JSON is case sensitive to both field names and data. The file must be encoded in UTF-8.
2. XML description file
The package must also include an XML description file so the extension can be shown in the user interface (see Using Extensions above) for setup. The XML file has the following structure: Note The root node must be named as "ew-extension".
| ```` |
The root node of the XML file, it contains information of the extension to be shown by the user interface. Note The root node must be named as "ew-extension".
Attributes:
- name - Extension name. This is the name shown in the Extensions form.
**Note** The extension name should contain alphanumeric characters only and should NOT start with digit.
- type - Type of the extension. This is the type shown in the Extensions form. If there are more than one extensions of the same type, only one extension can be enabled for that extension type.
|
| ```` |
Optional. Properties of the extension. You can add multiple <attribute> tags inside <project>, <table> and/or <field> tag.
If the <attribute> tag is enclosed by <project> tag, the attribute is project level, similarly for table and field level attributes.
Attributes:
- name - Attribute name. Note Make sure you provide a unique attribute name for each attribute under the same parent tag. The attribute name should contain alphanumeric characters only and should not start with digit.
- desc - Description of the attribute.
- type - Data type of the value. Support types are: "bool", "int", "double", "Color", "Table" and "Field". Others are considered as string.
- default- Optional. Specifies a default value for the setting.
- parent - For use with ``type="Field"`` only. Specifies the attribute (with ``type="Table"``) name for the table of the field.
- migration- Optional. Set to "1" to allow table schema migration, see ```` tag below.
|
| ```` |
Optional. For table schema migration. The **id** attribute of this tag must match the **name** attribute of the ```` tag (with ``migration="1"``).
Child elements:
- **sql**- SQL statement to execute, you can use ``{TableID}`` and ``{FieldID}`` to represent tables/fields in the SQL, the table/field IDs are defined by the following elements.
- **table** - Table name for the SQL. Attributes:
- **id** - Table ID in the SQL
- **name** - Default table name
- **desc** - Description of the table
- **field** - Field name for the SQL. Attributes:
- **id** - Field ID in the SQL
- **name** - Default field name
- **desc** - Description of the field
|
| ```` |
Optional. Additional files to be generated. Same as <control> tags in Control File. You can add multiple <control> tags for an extension. |
Note All of an XML document is case-sensitive, including the tag names, attribute name and values.The default encoding is UTF-8.
3. index.js
This is the main script of your extension, you can get the project level properties here and prepare for subsequent code generation, e.g.
Note If you need to pass your variables to other pages via the
global namespace object, to avoid tampering with the main template and other extensions, you should put your variables under your own namespace, e.g.
global.myNs.myVar. Alternatively, you can export your properties and methods by
module.exports (or the shortcut
exports) and access it in other pages by
EXTENSIONS["PackageName"].Exports.
For Custom View Tag and Custom Edit Tag, your main script must export at least the following method(s):
- CustomViewTemplate - Required. For Custom View Tag only. Method to output View Tag of the field.
- CustomViewTemplateExport - Optional. For Custom View Tag only. Method to output code (PHP only) to setup properties (e.g. ExportHrefValue property of the field object) before export. Only required if you want to output different values for export.
- CustomEditTemplate - Required. For Custom Edit Tag only. Method to output Edit Tag of the field.
e.g. index.js for Custom View Tag
4. README file
To help others using your code in their projects, you should include a README file in your extension. The content of the file is shown in the Notes tab (see above) when the extension is selected in the Extensions form.
In your extension root directory, create a file called README.md, add useful information about your extension in the file. The file extension .md indicates a Markdown file. For more information about Markdown, see Markdown. Also see About package README files for more information about README file.
4. Language files
Each extension may contain its own language files. The language file contains phrases for the extension. The phrases will be merged to the main languages during runtime. The file name should be in the format ``..xml``, e.g. *myExtension.en-US.xml*. If you support [Multi-Language](multilang.html), you should provide multiple language files, one for each language ID.
Your language files must have a parent element named by the extension name, e.g. if your extension name is "myExtension", then your language file should be like:
To retrieve the phrase by PHP you can use Language()->phrase("myExtension.foo").
To retrieve the phrase by JavaScript you can use, e.g. ``ew.language.phrases.myExtension.foo``.
6. Your files
Your code for the extension.
**Note** Your files must use [template tags](templatetags.html): <# ... #>.
**Append code to existing file**
To append code to a file in the template, just add a file **with the same name**. If the original file is **in a sub-folder**, e.g. (_"shared"_), your file in the extension should also be placed in a **subfolder with the same name**.
**Note** Previous versions supported prefixing the file name with subfolder name (e.g. <SubfolderName>-<FileName>.<ext>) and putting the file in the extension folder, it still works but it is deprecated and will be removed in next major version. It is recommended that you updated to the new method (with subfolder) as early as possible.
**Clear code in existing file and replace by yours**
To clear generated code of the original sub-template first and then replace with your own, add a file with the same name and add the following as the first line in your file before adding your own code:
**Note** If your code depends on the original code, **do NOT replace it entirely**. Only modify the parts that actually need changes (see below). Otherwise, future updates to the original code may cause your code to become inconsistent or break, and end users might mistakenly think the problem comes from the original code.
**Replace code in existing file**
It is recommended to **minimize code changes**. Only modify the parts that truly require updates, rather than replacing large sections. To replace part of generated code of a file in the template with your own, add a file with the **same name** and modify `args.code`. For example, if the code to be replaced can be matched by a regular expression, you can use:
where
/<regular expression>/ is your [regular expression](https://developer.mozilla.org/en-US/docs/Web/JavaScript/Guide/Regular_Expressions) to match the original code to be replaced.
**Add or copy your own files**
To generate additional files, make sure you add a `
` tag to the XML file (see above) for each file (or folder) you want to add or copy, see [Control File](controlxml.html) for details.
Similar to [Custom Files](customfile.html?id=learn-more), you can add various classes (e.g. services, controllers, event listeners and subscribers) to your application by extension.
In your files, you can get the extension properties (defined by tags in the XML description file, see above) as follows:
**Note** See the source files in the provided extensions, Custom View Tags or Custom Edit Tag as examples.
Publishing Extensions
If your extensions are for your own use only, you can simply put your extensions under the extensions folder, e.g. C:\Users\<user>\AppData\Roaming\PHPMaker<version>\extensions.
If you want to share your extensions with other users, you can publish your extensions. Since an extension is a npm package, you can publish to any npm registry. See:
To install an extension, open command prompt or PowerShell, go to the PHPMaker folder, e.g. C:\Users\<user>\AppData\Roaming\PHPMaker<version> (NO space between "PHPMaker" and "<version>"), and enter:
npm install [<@scope>/]<name>
where [<@scope>] is the optional scope of your package and <name> is the package name. See npm install for details.
**Note** All third-party tools must be implemented by extensions so they can be integrated into the main template. Installing a npm or Composer package of a third-party tool alone will NOT make the tool work with the template automatically. For example, you need the "@phpmaker/tinymce" extension (see below) to make TinyMCE work with PHPMaker, just installing the npm or Composer package of TinyMCE will NOT work.
Extensions (and Custom View/Edit Tags) shipped with PHPMaker
**RemoveXSS**
[https://github.com/ezyang/htmlpurifier](https://github.com/ezyang/htmlpurifier)
Sanitize field values by [HTML Purifier](https://github.com/ezyang/htmlpurifier) when saving to the database.
**TinyMCE 6**
[https://www.tiny.cloud/features/](https://www.tiny.cloud/features/)
**Date/Time Picker**
[https://github.com/Eonasdan/tempus-dominus/](https://github.com/Eonasdan/tempus-dominus/)
**Chart.js**
[https://www.chartjs.org/](https://www.chartjs.org/)
**Captcha**
Use CAPTCHA image to protect pages from spam and abuse.
**Audit Trail**
Provides more options for audit trail.
**Dompdf**
[https://github.com/dompdf/dompdf](https://github.com/dompdf/dompdf)
Requires DOM, GD and MBString PHP extensions.
**Themes**
https://getbootstrap.com/
https://adminlte.io/
Themes with **Bootstrap 5** and **AdminLTE 3**.
**Google Maps (Custom View Tag)**
[https://developers.google.com/maps/](https://developers.google.com/maps/)
Show locations (by longitude and latitude) and addresses by Google Map. Supports [Marker Clustering](https://developers.google.com/maps/documentation/javascript/marker-clustering).
**Note** Before you start using the Google Maps JavaScript API, you need a project with a billing account and the Maps JavaScript API enabled. See [Using API Keys](https://developers.google.com/maps/documentation/javascript/get-api-key).
**Barcode and QR code (Custom View Tag)**
[https://github.com/picqer/php-barcode-generator](https://github.com/picqer/php-barcode-generator)
[https://github.com/tecnickcom/TCPDF](https://github.com/tecnickcom/TCPDF)
**YouTube videos (Custom View Tag)**
[https://developers.google.com/youtube/](https://developers.google.com/youtube/)
**Bootstrap Colorpicker (Custom Edit Tag)**
[https://github.com/itsjavi/bootstrap-colorpicker/](https://github.com/itsjavi/bootstrap-colorpicker/)
Additional Extensions (and Custom View Tags) for Registered Users Only
**Note** These extensions and Custom View Tags are benefits for registered user only, there is NO trial version. Only registered users will be able to download these extensions when updating template.
**Chatify**
[https://github.com/munafio/chatify](https://github.com/munafio/chatify)
Add one-to-one real-time chatting system to your new site. Require [Pusher](https://pusher.com/) account.
**PhpSpreadsheet**
[https://github.com/PHPOffice/PhpSpreadsheet](https://github.com/PHPOffice/PhpSpreadsheet)
See the "require" section of [composer.json](https://github.com/PHPOffice/PhpSpreadsheet/blob/master/composer.json) for requirements.
**PHPWord**
[https://github.com/PHPOffice/PHPWord](https://github.com/PHPOffice/PHPWord)
See [Requirements](https://github.com/PHPOffice/PHPWord#requirements).
**reCAPTCHA**
[https://github.com/google/recaptcha](https://github.com/google/recaptcha)
**Rich FileManager**
[https://github.com/servocoder/RichFilemanager](https://github.com/servocoder/RichFilemanager)
**Time Picker**
[https://github.com/jonthornton/jquery-timepicker](https://github.com/jonthornton/jquery-timepicker)
**Detail Preview**
Allow previewing detail records in an expanded row of the main table in List page, or in Bootstrap [Popover](https://getbootstrap.com/docs/5.3/components/popovers/), [Modal](https://getbootstrap.com/docs/5.3/components/modal/), or [Offcanvas](https://getbootstrap.com/docs/5.3/components/offcanvas/).
**Infinite Scrolling Table**
Add infinite scrolling to the main table in the List page.
**Field Visibility**
Allow pre-setting the Visible property of field objects for different pages or actions. This extension only sets the `Visible` property according to settings. Read the notes for the extension for details.
**Field Encryption**
Allow encryption/decryption of selected fields when updating/retrieving data to/from table. Read the notes for the extension for details.
**SmsNotifier**
Use [Symfony SMS channel](https://symfony.com/doc/current/notifier.html#notifier-sms-channel) to send SMS messages.
**Note** You must subscribe to a third party SMS service and retrieve the credentials for the integration. Read the notes for the extension for details.
**Leaflet (Custom View Tag)**
[Leaflet](https://leafletjs.com) is open-source JavaScript library for mobile-friendly interactive maps. Supports [OpenStreetMap](https://www.openstreetmap.org/about) and [Mapbox](https://www.mapbox.com/) (**Requires Mapbox access token**).
Also See
Control File
Template Tags
Object Properties
Third-party Tools