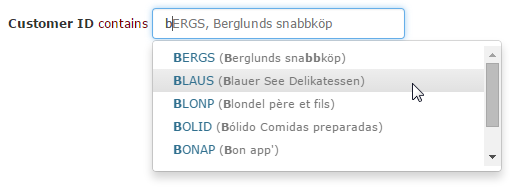
Lookup Table is used for lookup field with Text (Auto-Suggest), Radio, Checkbox and Select Edit Tags. To enable, check Use lookup table under Edit Tag panel after selecting one of the Edit Tags.
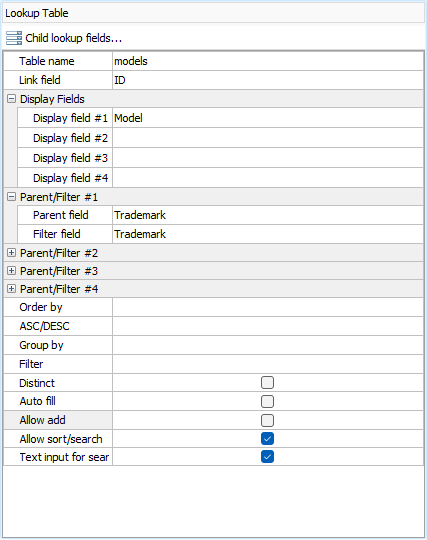
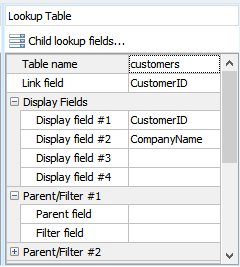
The Lookup Table panel has the following options.
| Table name | Required. The lookup table to be linked to. |
| Link field | Required. The field to be used as the value of an option. Note that this is the actual value to be submitted by the form This field is usually the key field of the lookup table. |
| Display field #1 | Required. The field in lookup table to be used as the label of an option. |
| Display field #2 | Optional. The 2nd field in lookup table to be included in the label. |
| Display field #3 | Optional. The 3rd field in lookup table to be included in the label. |
| Display field #4 | Optional. The 4th field in lookup table to be included in the label. |
| Parent field #1 | Optional. For use with dynamic selection lists.
Specify the parent field (in the current table) for
the current selection list.
When the parent selection list is changed, the available options in current selection list will be changed accordingly. Each field can have up to 4 parent fields. Note Parent field
is solely used with Filter field
for dynamic selection lists only. Each Parent
field MUST have a corresponding Filter
field. The Parent
field alone does NOT do any filtering.
|
| Filter field #1 | Optional. For use with dynamic selection lists.
Specify the filter field (in the lookup table) for
filtering.
When the parent selection list changes, only options (records from the lookup table) with Filter field value matching the selected value(s) of its corresponding Parent field will be shown. Note Filter field
is solely used with Parent field
for dynamic selection lists only. Each Filter
field MUST have a corresponding Parent
field. The Filter
field alone does NOT do any filtering.
|
| Parent/Filter #2 | Optional. For use with dynamic selection lists. The
2nd pair of parent field and filter field.
If setup, the filtering of lookup table records will be based on 2 fields. For example, if you have set up Parent/Filter field #1 and Parent/Filter field #2, and both Parent field #1 and Parent field #2 have selected value, the records will be filtered by: (Filter field #1 value = Parent field #1 selected value) AND (Filter field #2 value = Parent field #2 selected value) Note By default, if either
parent field is not selected, above filter will lead
to no results, the field will not have any options.
|
| Parent/Filter #3 | Optional. For use with dynamic selection lists. The 3rd pair of parent field and filter field. If setup, the filtering of lookup table records will be based on 3 fields. |
| Parent/Filter #4 | Optional. For use with dynamic selection lists. The 4th pair of parent field and filter field. If setup, the filtering of lookup table records will be based on 4 fields. |
| Order by | Optional. Specify a field in the lookup table for sorting the options. |
| ASC/DESC | Optional. Sorting order. For use with Order By. |
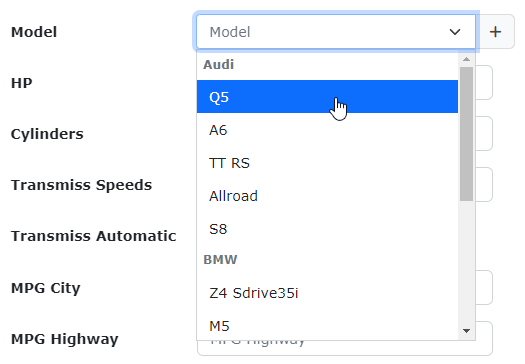
| Group by | Optional. Specify a field in the lookup table for
grouping the options by <optgroup> (HTML Option Group element), e.g.
Note This is a field for creating <optgroup> elements in the selection list only, NOT a field for adding GROUP BY clause. |
| Filter | Optional. Specify the WHERE clause of the SELECT
statement for the lookup table. The input should be
a valid PHP expression. If it is a string, it should
be quoted.
If your lookup table has a special field (e.g. named "ALookupTableField") for filtering the records by a field (e.g. named "AField") in the current record (of the current table), you can enter: Notes
|
| Distinct | Optional. Specify adding DISTINCT option to the SELECT statement for the lookup table. |
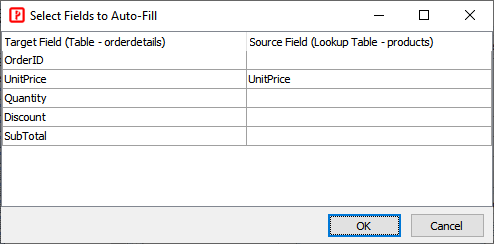
| Auto fill | Optional. If enabled, the script fills the target
fields for you automatically.
For example, when you select a product number (which is a lookup field using the product table as its lookup table), it will fill product price textbox for you. Note Before using Auto-Fill,
review your database design, you should consider database normalization, in
many cases you do NOT need to and you should NOT
copy the field values from one table to another. You
can view the other field values by creating a
query/view joining the current table with the lookup
table using the parent field as linked field.
The required conditions are:
If properly set up, when the user changes the selected value of the field, the scripts will try to use other field values (specified by [Source Field]) of the selected record (from the lookup table) to fill the target fields of the current table (specified by [Target Field]) automatically. Click the [...] button and select the source fields and target fields: Note
In this example, when you select a product from combobox, the script know the product ID from the option value, so it can use the ID to locate the product from the same lookup table (your product table) and retrieve other field values such as the product unit price and fill the target fields. Note Do NOT setup fields to
autofill each other. For example, if you set up
field A to autofill field B (A -> B) and B ->
A, it will be an infinite loop. Similarly, if you
setup A -> B and B -> C and C -> A, it will
not work either.
|
| Allow add | Optional. If enabled, the user will be allowed to
add an option to the selection list.
Notes
|
| Allow sort/search | Enable sorting and searching of the display
values instead of the field values. For use with Select
(select-one) or Radio or Text
Edit Tag only.
Since display values are field values in the lookup table (not in the main table), they are retrieved dynamically by code during execution of the script and normally the field cannot be sorted or searched by the display values. PHPMaker makes it possible by adding a subquery to the SQL to create a virtual field in the main table. Limitations
|
| Text input for search | Enable text input for the field in the search
forms. For use with Select
(select-one) or Radio or Text
Edit Tag with Allow sort/search
enabled.
If Edit Tag is not Text (i.e. Select or Radio) and you have enabled Allow sort/search, you may want to search with a textbox instead of combobox or radio buttons. If so, enable this setting. Note that if Edit Tag is Text and you have enabled Allow sort/search, the input is textbox, this setting is enabled automatically even you have not checked this setting to enable it explicitly. Note NOT compatible with
Dynamic Selection Lists. When this option is
enabled, the form element value (and the submitted
value) is always the text input (not the Link
field value) for searching to work.
Therefore, if the field is a parent field in Dynamic
Selection Lists (see below), the child fields may
not work in the search forms.
|
Option Template
By default, the options are displayed as comma separated values of the display field values. If you just want to change the display value separator from comma to other string, you can use server events such as Page_Load (see Server Events and Client Scripts) to set the field object's DisplayValueSeparator property, e.g. if the field name is "MyField",
However, if you want to display the link field and the display fields in your own HTML, you can use Option Template, just write your HTML code in Option template under Edit Tag panel, e.g. if you have settings like:
and you enter Option Template like:
Then the options for the field will be displayed in your HTML format like:
Option Template supports the following tags:
| `{{:lf}}` | Link field value |
| `{{:df1}}` | Display field #1 value |
| `{{:df2}}` | Display field #2 value |
| `{{:df3}}` | Display field #3 value |
| `{{:df4}}` | Display field #4 value |
If the options needs to show some additional data from the lookup table, you can get the additional data as Display fields so you can use them in Option Template. If you use Text Edit tag (see Field Setup), sometimes you may not need the additional data in the input textbox, then again you can set the DisplayValueSeparator property by server event. If the separator for a display field is not specified, the display field value will not be placed in the input textbox. There are 3 possible settings:
AJAX by API and Client Scripts
Sometimes you may want to access the lookup table by AJAX yourself. For example, after the user entering a value for a field, you may want to auto-fill another field in your own way, then you can use API and Client Scripts to do it (in such cases do not enable the built-in Auto-Fill in the Lookup Table panel). Say, if you want to fill the product price when you select a product number (using products table as lookup table) when inserting a new record, you can auto-fill the product price in orderdetails table either asynchronously or synchronously with your code.
Example 1 - Auto-Fill asynchronously by "view" action of API
Write a Startup Script (JavaScript) for Add Page (e.g. orderdetails) to attach onchange event and get data from other table (e.g. products) by "view" action of API.
Example 2 - Auto-Fill synchronously by ew.ajax()
Write a Startup Script (JavaScript) for Add Page to attach onchange event.
Example 3 - Auto-Fill asynchronously by ew.ajax()
Write a Startup Script (JavaScript) for
Add Page to attach onchange event. Also see note in Example 2.
Example 4 - Auto-Fill asynchronously by custom API action and client script
Add a custom API action, say "getUnitPriceByProductID", by API action controller and return the required value. In this example, only a single value is required so ExecuteScalar() is used, e.g.
If you want to return a whole row as JSON, you can use JsonResponse in combination with ExecuteRow() (see Server Events and Client Scripts), e.g.
Write a Startup Script (JavaScript) for
Add Page to attach onchange event:
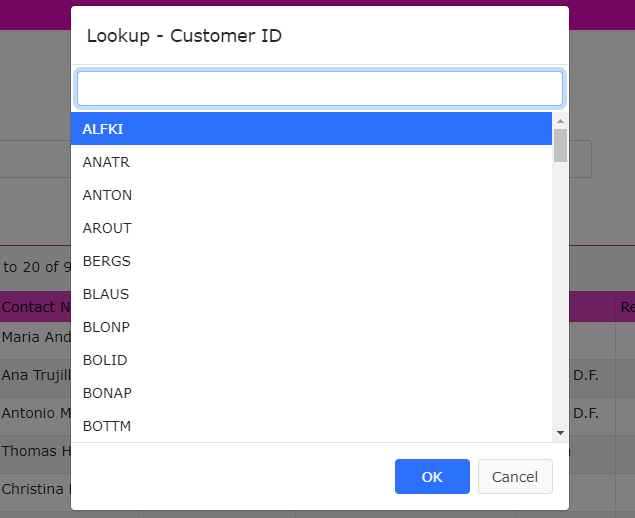
Use Modal Dialog for Lookup
For Edit Tags with lookup table (i.e. TEXT/SELECT/RADIO/CHEKCBOX), you can choose to enable Use Modal Dialog for Lookup to replace the Edit Tag with a modal dialog. The modal dialog does not only allow user select a record from the lookup table, but also supports searching and paging (infinite scrolling).