
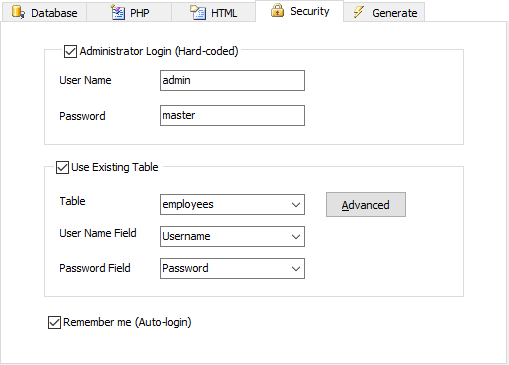
| Administrator Login (Hard-Coded) | Administrator user name and password |
| User Name | User Name for administrator (see note below) |
| Password | Password for administrator (see note below) |
| Use Existing Table | Link to existing table for login name and password validation |
| Table | Existing table in database containing login name and password information |
| User Name Field | User name field in table used for authentication |
| Password Field | Password field in table used for authentication |
| Remember me (Auto-login) | Auto login until the user logout explicitly. If enabled, a "Remember me" checkbox will be shown in the Login page, cookies will be used to "remember" the user's username and password. |
Advanced Security
Advanced Security feature allows you to setup User ID, assign User Levels to users and create a complete user registration system. To setup, click the Advanced button.
PHPMaker supports two types of security - User ID and User Level. User ID Security secures data at record level. User Level Security secures data at table level. They complements each other and they can work independently or together. Users get their User ID and User Level after login. Before login, an user's identity is unknown and the user is an Anonymous User.
User ID Security secures data at record level. Protected tables must have an User ID field for identifying which user a record belongs to. The User ID field names can be different in tables though. When User ID security is enabled, users can only access their own data.
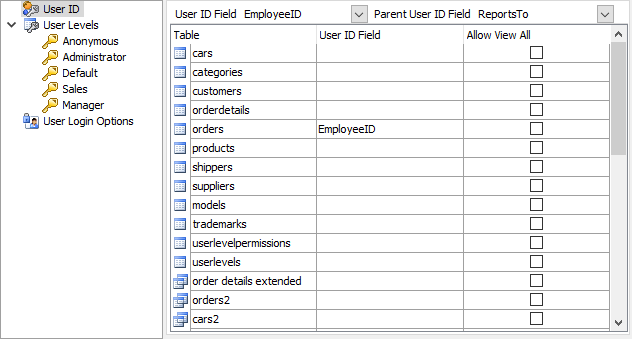
Steps to setup User ID security for different tables/views:
User Level Security secures data at table level. Each user level is granted with specific permissions to tables in the database.
There are 2 types of User Level security:
1. Static User Levels - the User Levels and the permissions are defined in this form and the User Levels cannot be changed with generated scripts.
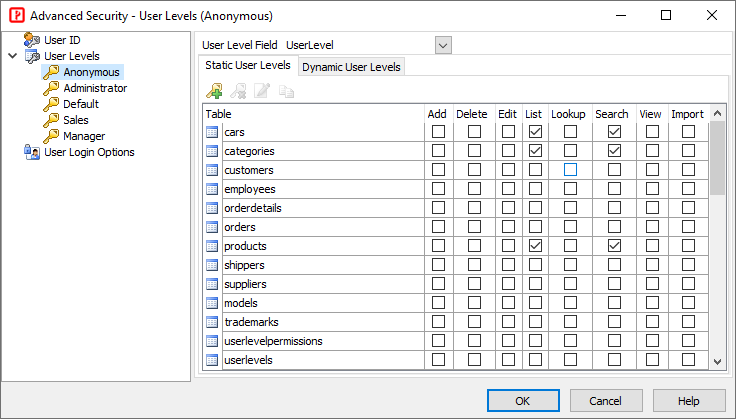
Steps to setup static User Level security for different tables/views:
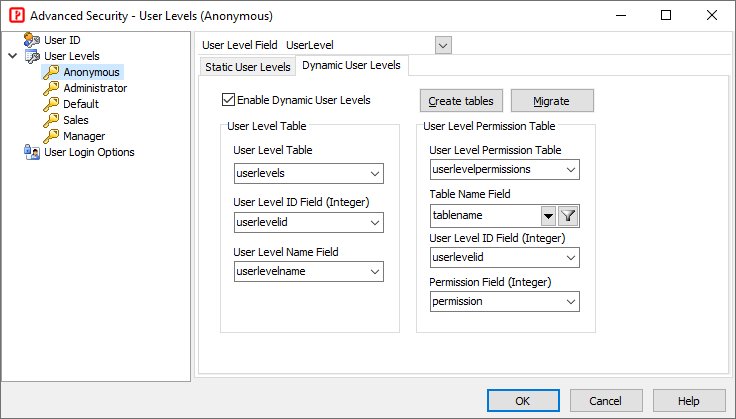
2. Dynamic User Levels - the User Levels and the permissions are defined in 2 tables in the database, the User Levels can be changed with the generated scripts.
Steps to setup dynamic User Level security for different tables/views:
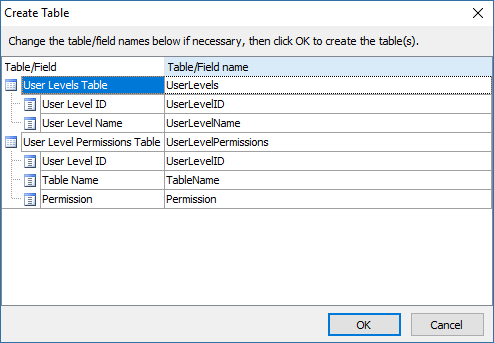
The User Level Table and User Level Permission Table must have the following fields, note the data types, User Level ID and the Permission fields must be of integer type, the field names can be different though:

User Level Table

User Level Permission Table
If you want PHPMaker to create these 2 tables in your database, click the Create tablesbutton, the following form will display for you to change the table/field names if necessary. You can change the table/field names and then click OK to continue.
If you have projects created by previous versions of PHPMaker you may want to use dynamic User Levels and migrate the previously defined static User Levels in the project to the database. After selecting or creating the User Level and User Level Permission tables/fields, just click the Migrate button to let PHPMaker do that for you.
After setting the user levels, PHPMaker will populate the user levels to the User Level field's Edit Tag (also see Field Setup) so administrators can assign user levels using the generated pages.
There are three built-in user levels:
Anonymous - Anonymous user level is a built-in user level for the Anonymous User (i.e. users that have not logged in). Anonymous is -2.
Administrator - Administrator user level is a built-in user level that has all permissions plus the privileges to modify User IDs and User Levels. Its permissions are same as that of the hard-coded Administrator. The User Level ID of Administrator is -1.
Default - Default user level is built-in user level with user level = 0. Since User Level field is an integer field, if you set a default value of 0 for this field, this user level will become the default user level for the user after registration and before the Administrator assigning another higher user level.
User Login Options allows you to create a complete user registration system for your website, with options
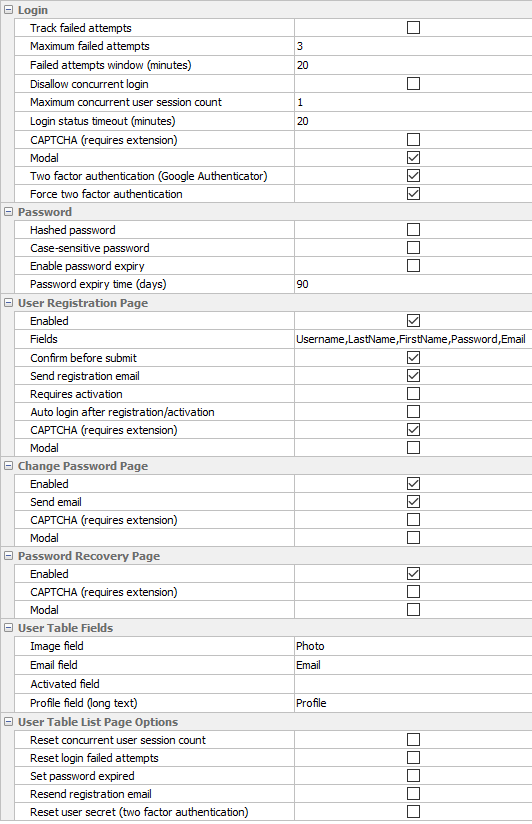
| Login | |
| Track failed attempts | If enabled, number of failed login attempts (invalid password) will be tracked. If exceeded, the user will be locked out and the password must be reset. |
| Maximum failed attempts | The maximum number of failed login attempts. |
| Failed attempts windows (minutes) | The time window, in minutes, during which failed password attempts are tracked. |
| Disallow concurrent login | If enabled, only one session is allowed for each user (except the hard-coded Administrator). If one user has already logged in, other users trying to login with the same username (and password) will be rejected.
Note Users are distinguished by Session ID as recognized by the web server. If you login again with your PC in another window of the same browser or in just another tab of your browser, you can still login. If you login again with another browser or another PC, the Session ID will be different and the login will be rejected.
|
| Maximum concurrent user session count | For use with Disallow concurrent login. By default only one session is allowed for each user. But you may want to give more than one chance to user so they will not be rejected after unexpected incidents such as a system crash.
Note Please be reminded that this option somewhat compromise the Disallow concurrent login feature. Use this option discreetly and always use the smallest possible value. |
| Login status timeout (minutes) | The number of idle minutes after which the login status will be considered as logged out and login will be allowed again.
If a logged-in user does not explicitly log out (for example, close the browser directly), the user session is not closed and the user's login status will remain as "logged in". Attempts to login again will fail. This timeout setting ensures login will be allowed again after a period of idle time. |
| CAPTCHA (requires extension) | Optionally requires user to type letters or digits from a distorted image that appears on the screen..
Note Requires CAPTCHA extension, click Tools -> Extensions from the main menu to enable. Also see Third-party Tools. |
| Modal | Use modal dialog for login. |
| Two factor authentication | Enable two factor authentication. |
| Two factor authentication type |
|
| Force two factor authentication | Force use of two factor authentication. If enabled, the user must use Google Authenticator to login. See Two Factor Authentication for details. |
| Password | |
| Hashed password | Use hashed password. If the advanced setting Use password hash is enabled, password_hash will be used to create password, otherwise md5 will be used.
Notes
|
| Case-sensitive password | Use case-sensitive password |
| Enable password expiry | If enabled, user password will expire after a period of time (except the hard-coded Administrator password). |
| Password expiry time (days) | For use with Enable password expiry, user password will expire after the specified number of days. |
| User Registration Page | |
| Enabled | Generate user registration page and add a link in login page. |
| Fields | Select fields (from the user table) to show in the registration page. Click the [...] button the select the fields. |
| Confirm before submit | Display confirm page before submitting the registration |
| Send registration email | Optionally send email confirmation after registration |
| Requires activation | Optionally requires user click an activation link in the email sent after registration to activate the user account.
Note Send email must be enabled for sending the email with activation link.
|
| Auto login after registration/activation | Optionally auto-login the user after registration or activation.
Note Requires activation is enabled, the user is not activated yet after registration, auto login will be applied when the user clicks the activation link in the email.
|
| CAPTCHA (requires extension) | Optionally requires user to type letters or digits from a distorted image that appears on the screen..
Note Requires CAPTCHA extension, click Tools -> Extensions from the main menu to enable. Also see Third-party Tools.
|
| Modal | Use modal dialog for registration page. |
| Change Password Page | |
| Enabled | Generate change password page |
| Send email | Optional email confirmation after changing password |
| CAPTCHA (requires extension) | Optionally requires user to type letters or digits from a distorted image that appears on the screen.
Note Requires CAPTCHA extension, click Tools -> Extensions from the main menu to enable. Also see Third-party Tools. |
| Modal | Use modal dialog for change password page. |
| Password Recovery Page | |
| Enabled | Generate password recovery page (forgot password page) and add a link in login page. User name and password will be sent to the user's email address. |
| CAPTCHA (requires extension) | Optionally requires user to type letters or digits from a distorted image that appears on the screen.
Note Requires CAPTCHA extension, click Tools -> Extensions from the main menu to enable. Also see Third-party Tools. |
| Modal | Use modal dialog for password recovery page. |
| User Table Fields | |
| Image field | Image field in user table used for showing user photo in sidebar |
| Email address field | Email address field in user table used for sending email |
| Activated field | Email activated field in user table used for storing the status of user. A boolean field is recommended, although an integer field or a string field will also work.
Notes
|
| Profile field | A long text field (e.g. TEXT or VARCHAR(65536) in MySQL, VARCHAR(65536) or VARCHAR(max) in SQL Server) for persisting all the additional user information. This field is required if the following options are used:
Note The field is also required if the advanced setting Search filter save option is set to Server, see Tools -> Advanced Settings.
|
| User Table List Page Options | |
| Reset concurrent user session count | If enabled, a new option is generated in the User Table list page for the administrator to reset the concurrent user session count for an user to 0 |
| Reset login failed attempts | If enabled, a new option is generated in the User Table list page for the administrator to reset the login failed attempts for an user to 0 |
| Set password expired | If enabled, a new option is generated in the User Table list page for the administrator to set the password of an user as expired |
| Resend registration email | If enabled, a new option is generated in the User Table list page for the administrator to resend the registration email to an user |
| Reset user secret (two factor authentication) | If enabled, a new option is generated in the User Table list page for the administrator to reset the user secret for two factor authentication. See Two Factor Authentication for details. |
Email Templates
The email sending function and the email contents can be customized in the template. The following special tags are used in the email templates:
<!--$From--> is sender email address
<!--$To--> is user email address
<!--$Password--> is user password
<!--FieldName--> (without the $ symbol) is the field value, e.g. <!--LastName--> is the field value of the field "LastName".
You can also dynamically change the email by code using Email_Sending event before the email is sent. (See Server Events and Client Scripts.)
Also See
Tutorial - User ID Security
Tutorial - Static User Level Security
Tutorial - Dynamic User Level Security
Tutorial - User Registration System
Tutorial - Multi-Language Project Setup
Two Factor Authentication