HTML Settings
General
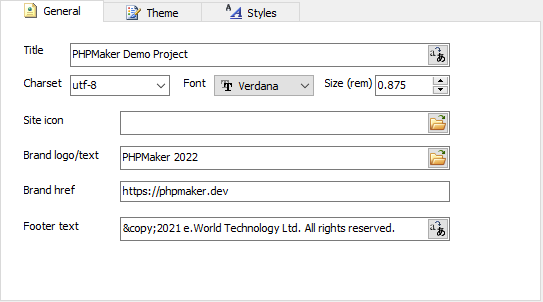
| Title |
Title of the website.
Note If you use Multi-Language (see PHP Settings), use Multi-Language Property Editor, see Tools for details. |
| Charset |
Deprecated Charset of the website. The value must be an ASCII case-insensitive match for the string "utf-8", because UTF-8 is the only valid encoding for HTML5 documents.
|
| Font |
Default font. If not specified, Bootstrap $font-family-sans-serif will be used, see Native font stack. |
| Size (rem) |
Default font size (rem). Unit must be in rem for working with Bootstrap. Default is `.875rem`. |
| Site icon |
Icon of the site. For browsers to show your URL with an icon. Should be an .ico, .svg or .png file. |
| Brand logo/text |
Logo image or text in the header. |
| Brand href |
URL of the brand logo image or text in the header. |
| Footer text |
Footer text (e.g. copyright statement)
Note If you use Multi-Language (see PHP Settings), use Multi-Language Property Editor, see Tools for details.
|
Theme
Provides many themes for you to setup the look and feel of your project quickly.
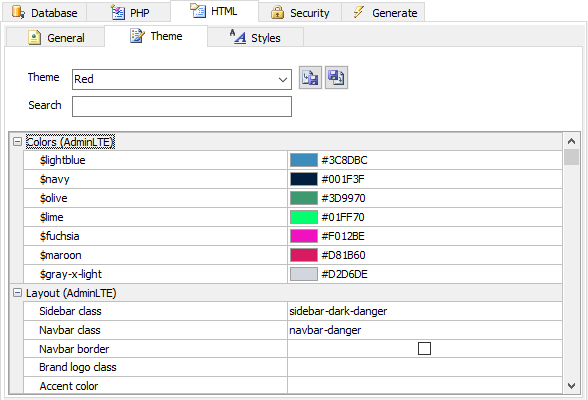
Themes are integrated with Bootstrap and AdminLTE, you can customize Bootstrap and AdminLTE properties directly in the Theme tab, scroll down to find the Bootstrap or AdminLTE variables starting with ``$``.
You can change the various properties of the selected theme to suit your style. The property name are self-explanatory. Read Bootstrap documentation for more information, there is a Sass section in each article.
To use built-in themes, just select a theme from the Theme setting.
To export custom theme settings, click the Export theme button to export the theme to an external xml file. To import custom theme settings from earlier saved xml files, click the Import theme button.
There are a lot of theme settings, you can use the Search box to quickly filter the settings by name.
Notes
- Normally when you open an old project from previous versions, PHPMaker will convert the theme settings for the new version. If the theme settings are not converted completely, you may see Sass compilation error, you can fix it by re-selecting a theme to update the theme settings.
- Changing a setting in the user interface does not change the corresponding setting in the theme definitions, it only changes the setting for the project. The theme definition files (in XML format) are installed in the subfolder "themes" under the installation folder. You can easily add your own themes by duplicating one of the theme definition file (e.g. plain.xml), rename it and modify the settings in the file, just make sure you give your theme a unique theme name.
- AdminLTE builts on top of Bootstrap, some AdminLTE settings change the default value of the corresponding Bootstrap variables.
- After changing theme properties, make sure you re-generate all *.css files.
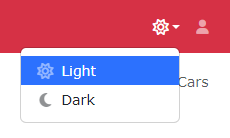
##### Dark Mode
From v2024 PHPMaker uses [Bootstrap 5.3](https://getbootstrap.com/) with [Dark Mode](https://getbootstrap.com/docs/5.3/customize/color-modes/#dark-mode) support. If you want to use dark mode, read [Color modes](https://getbootstrap.com/docs/5.3/customize/color-modes/) first.
To enable dark mode, search "mode" among theme settings and set the following two Bootstrap variables:
1. ``$enable-dark-mode`` - Enable dark mode. Default is ``true``. If your site does not support dark mode, you should disable this setting so the file sizes of stylesheets will be smaller.
1. ``$color-mode-type`` - Color mode type, possible values are: "data" or "media-query". Default is "data".
The "data" color mode type means data attribute approach, it allows you to create more user-friendly experiences where your visitors can choose "dark" mode or "light" mode within your site, the CSS styles are outputted like:
The "media-query" color mode type means media queries approach (see [prefers-color-scheme](https://developer.mozilla.org/en-US/docs/Web/CSS/@media/prefers-color-scheme)), the color mode is automatic (NOT chosen within your site). A user indicates their preference through an operating system setting (e.g. light or dark mode) or a user agent setting. The CSS styles are outputted like:
When dark mode is enabled, a color mode toggler will appear at the top right of the site, e.g.
The HTML is rendered by an [Auto JS Template](customscripts.html?id=auto-js-template) with ``data-name="colormodes"``, you can find it in the generated *layout.php*. If you want to change the phrases and the icons, you can customize the language files. If you want to change it to your own design, you can replace the template by putting your own in [Page_Foot](customscripts.html?id=page_foot) server event. However, note that you need to provide your own JavaScript to handle the color mode toggling if you change the default dropdown to something else.
Styles
**Note** From v2024 PHPMaker uses [Bootstrap 5.3](https://getbootstrap.com/), the theme variables are different from previous
versions. If you have added any custom CSS styles here for Bootstrap 4, 5.1 or 5.2 previously, you may need to update your styles.
There are some major changes in Bootstrap 5.3, see [Migrating to v5.3](https://getbootstrap.com/docs/5.3/migration/).
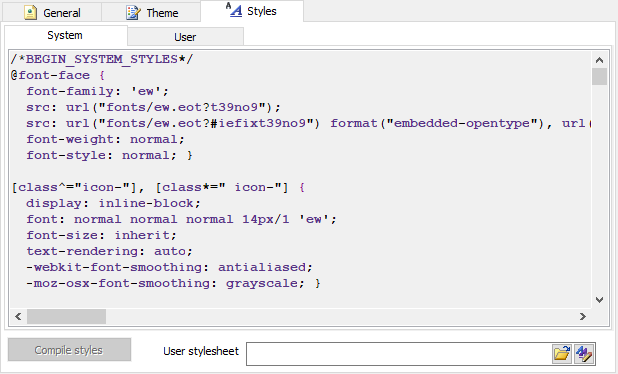
The CSS styles under the System tab are styles generated for the project. The CSS styles under the User tab are your own CSS styles. You can enter your styles directly in the editor.
| Compile styles |
Complie user styles.
User styles Supports Sass, you can use Bootstrap and AdminLTE variables (starting with ``$``) in your code. After entering your styles, press this button to test, PHPMaker will try to compile your styles and show it in the System tab between ``/*BEGIN_USER_STYLES*/`` and ``/*BEGIN_USER_STYLES*/``.
Notes
- If you want to override the system styles, you can copy the styles to the
User Styles Section, or you can use a separate user stylesheet.
- If you want to change the system stylesheet
template, modify the ew.scss in the "themes" subfolder under the installed
directory. Only modify the ew.scss if you have the necessary knowledges in Sass.
|
| User Stylesheet |
Specify an external user stylesheet (will be copied across during
generation) |
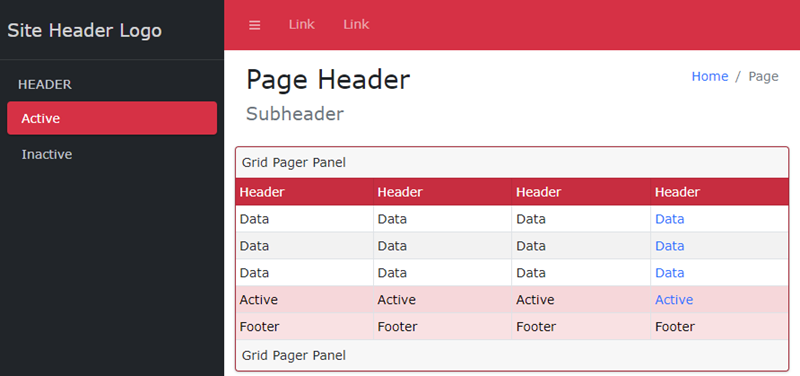
You can see the effect of new settings immediately in the preview window
at the bottom of the HTML tab.
Notes
- The preview window requires Webview2 Runtime to work.
- If you do not need HTML preview, you can disable it by the advanced setting HTML preview and make the UI performs faster in this page.
- The preview window shows the layout and table colors only, it cannot show changes in all variables. If you want to preview more, you can customize the file <AppData Folder>\themes\preview\ew.html, e.g. C:\Users\<user>\AppData\Roaming\PHPMaker<version>\themes\preview\ew.html.